It is finally the weekend. I have successfully made it through the first week of my second semester of my third year as an undergrad at Cornell. My week was a little rough; I star1ted the semester off not having any idea what classes to take (although I was aiming to take classes that would teach me valuable life skills), and just when I thought my schedule was good, I realized that my plant physiology class (lecture + lab, a total of 5 credits) was not at all what I had hoped for, and so I was faced with the difficult task of finding new classes that fit around my current ones and my work schedule. It was very difficult and frustrating, but I am very grateful to Karli because she encouraged me to drop the plant physiology class in favor of taking classes that I would actually enjoy (the textbook for the class was a draft written by the professor, and I was going crazy trying to read it because there were so many grammatical errors and it was just written poorly in general).
This semester, I am taking Sculpture IV with Michael Ashkin (I had him last semester for sculpture and really loved the class), Early Agriculture (how we evolved from nomadic peoples to an agriculturally-based society), Seminar in Agricultural Science (current issues in agriculture), Hands-On Horticulture (basic horticultural techniques), The Nature of Plants (plant interactions), Wines & Vines Laboratory (how to make your own wine, graft your own grape vines, etc.), and Food, Farming, & Personal Beliefs (tying the three together and their relationship to sustainable agriculture). Oh yeah, and a few credits of independent research with the Communication Department under Jeff Hancock (we still have a study to run that Steph and I designed over the summer).
I found out on Thursday that muslin pictures of my designs for CDL (Cornell Design League, the fashion design club I am in ) are due this coming week, and although I tried to work on them over break, I just didn’t get much done because I was doing so many other awesome things. So, this weekend, I plan on just working on homework and my designs. Last night, I went to the two, just two, fabric stores in Ithaca that carry apparel fabrics, and couldn’t find what I was looking for in either store. I need to find some very light, semi-transparent cotton, I am not sure of the exact name for it, but looking online, it might be called ‘cotton lawn’. I get to design two outfits this year because I was a first-year designer last year, and every successive year, you get more designs and models. I want my designs to be very flowy and moveable. I want the wearer to want to dance and move when she wears the outfit, and I want the designs’ movements to mirror those of the wearer and communicate her body’s expressions to others.
That being said, I also have a potluck/party to go to tonight, and thought it would be really awesome to try to experiment with some gluten-free chocolate cupcakes to bring. I attempted to whip up some cupcakes last night by modifying the recipe on About.com for gluten-free german chocolate cake (http://vegetarian.about.com/od/glutenfreedesserts/r/germanchocolate.htm, I made this recipe once before and it turned out well). The changes I made caused the batter to behave very bizarrely; the cupcakes didn’t really rise, and instead sunk in the centers. However, they were delicious and had a semi-crunchy top kind of like a muffin. Since they were good, I won’t condemn the entire recipe, but I definitely will make sure I don’t make the same mistakes next time! I am thinking about tearing apart the cupcakes, mixing them with frosting, rolling them into balls and coating them in chocolate to make chocolate truffles..... I'll let you know how that goes!
...more recipes to come soon, I have just been busy with school!
Saturday, January 29, 2011
Monday, January 24, 2011
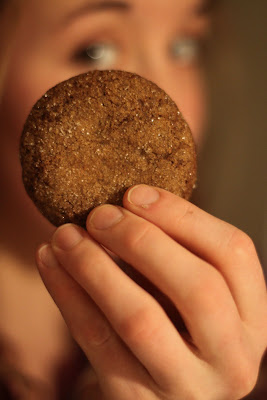
Gluten-free brownies
The end to winter break is here, and it is bittersweet. Outside, the sun is shining, and the naked trees are casting long slender shadows on the sparkling powder. Who cares if weather.com says it is only 5 degrees Fahrenheit outside? I don’t; it is still beautiful.
Saturday, I went on a long, beautiful, early afternoon run and only passed by one group of other people out (because it was pretty cold). I suited up in all of my cold gear, and with new road running shoes, I set off by foot around the outskirts of the plantations, following Forest Home road until it meets up with 366, up the hill, down Game Farm Road (such a beautiful road to run on), past East Hill Plaza, and through Cornell Campus on my way back into civilization. By the time I was done, my legs were so sore from running in new shoes and my feet were killing me, so I spun poi and danced for a bit in the Helen Newman dance studio (such a beautiful space).
I spent Saturday afternoon being lazy and just hanging out with a bunch of my girl friends in Collegetown. Karli and I finger painted, and although my friend Alex, and I gave up after painting for a little while, Karli worked on her masterpiece for a quite a while, but ended up not liking it as much when it dried. Sid, Varya, and Christine took turns playing some iPhone game that involved slicing flying fruit in half. Karli and I made some really delicious dinner, which was a vegetable curry over white rice.
I decided that it was the perfect occasion to break out my wok, and cooked some onions, garlic, sweet peppers, mushrooms, and tofu cubes together with coconut milk, turmeric, cumin, and curry powder. We used long grain white rice so it would cook more quickly because we were both starving. Dinner was delicious, and the most time-consuming part was chopping and cooking the vegetables prior to adding the coconut milk and spices. The end result was definitely work it though!
Reflecting back on my winter break, I am so happy that I had the time to do so many things which I have been meaning to do, and take some time off to myself to just relax (yoga, poi, running, etc., have all been great). I feel like I got a lot done, but there are still so many other things that I would have liked to have done too. Life is a balancing act; you have to choose what interests you the most and pursue it while still working on a handful of other things.
I made some modifications to the basic brownie recipe in the Fannie Farmer Cookbook, and brought heart-shaped brownies (I used a cookie cutter to cut out the hearts after I made the brownies) to Varya’s house the other night for Blini (Russian pancake) night. I created a new gluten-free flour blend, and am going to experiment to see what it is good for (it was definitely good for the brownies!).
Gluten-free flour blend #2:
2 cups oat flour (I used whole oats and processed them into flour)
2 cups millet flour
1 cup sweet white sorghum four
½ cup garbanzo bean flour
½ cup white rice flour
½ cup tapioca flour
1 cup potato starch flour
5 ½ teaspoons xanthan gum
Mix all of the flours & xanthan gum together until uniform in texture.
Basic gluten-free brownies (adapted from the Fannie Farmer Cookbook)
6 ounces mexican chocolate
¾ cup butter (1 ½ sticks)
4 eggs
1 cup dark brown sugar, packed
1 cup light brown sugar, packed
¼ cup white sugar
1 ½ cups gluten-free flour blend #2
Preheat oven to 375 degrees Fahrenheit. Melt chocolate and butter over low heat on the stove, stirring to make sure the mixture doesn’t burn. When it has melted, remove from heat and let cool for a couple of minutes.
In a large bowl, beat eggs, and sugar, and beat until thick and creamy (5-6 minutes) with an electric mixer. Stir in chocolate & butter mixture, and then finally add the flour. Stir everything together and bake in a large (I used a 9 x 14 x 2-inch glass baking dish) pan/dish for about 25 minutes.
Brownies are done when they are slightly browned on top and are starting to crack. Let cool, and cut into squares or use your favorite cookie cutters to make cute shapes!
Saturday, January 22, 2011
Cardamom Purple Sticky Rice Pudding & Gluten-free chocolate cardamom coffee molasses cookies
The inevitable consequence of always trying to come up with recipes and experimenting in the kitchen is that you have to be your own taste-tester, and generally, you are your own harshest critic. That being said, I am positive that I have eaten more cookies now that I know I have gluten intolerance than beforehand. Why? Gluten-free baking is so much more fun and exciting than regular baking. The chances that your recipe will fail are so much higher with gluten-free baking than regular baking and the suspense when you wait for your freshly baked goods to come out of the oven perfectly plump and delicious is amazing.
I have been meaning to try making a sweet coconut sticky rice/rice pudding for a really long time (ever since I tasted it at Taste of Thai Express in Downtown Ithaca), and have really been dying to come up with a recipe that does not include many cups of sugar. A recipe where you can actually taste and appreciate the flavor of the rice. I like to try to sweeten things with maple syrup or honey as much as I can, so I decided to try a purple sticky rice pudding with Thai Kitchen’s Organic Lite Coconut Milk and Grade B (dark) Maple Syrup (from Greenstar’s bulk department).
My good friend, Hope Rainbow introduced me to cardamom last semester when made a delicious sweet coconut cardamom wild rice dish for breakfast in sculpture class (we had leftover supplies from our Ginger Babel project). I really love cardamom, and have been trying to use it frequently.
Coconut Cardamom Purple Sticky Rice Pudding Pudding:
1 cup purple sticky rice
1 cup water
1 cup Thai Kitchen’s Organic Lite Coconut Milk
2 tbsp maple syrup
8 cardamom pods, whole
To drizzle on top:
½ cup coconut milk
4 tbsp maple syrup
In a medium sauce pan, combine 1 cup purple sticky rice with 1 cup of water, 1 cup of the coconut milk (before you open the can, shake it to make sure the coconut milk is not chunky), and 2 tbsp maple syrup. Bring to a boil, then reduce to a simmer and stir once in a while until rice is cooked and water & milk have been absorbed.
When rice is done, in a separate sauce pan, heat up the rest of the can of coconut milk (should be about ½ a cup) with 4 tablespoons of maple syrup and stir until combined and boiling.
You can serve either hot or cold (I prefer it hot). Scoop some rice into a dish, and pour the maple coconut milk on top, or you can layer the rice and the maple coconut milk. Yum :)
I am so happy that my friends are finally all getting back from break!! It was very peaceful and relaxing to have Ithaca all to myself for an entire month, but after a month of limited social interaction, I am ready to start hanging out again (at least until my school work wrenches me away from my friends). Yesterday, I went to Salvo with Varya & bought a large canning pot, and can't wait until the things start growing again.
Last summer at the farm, the tomatoes were so perfect and ripe that they fell off the vines and into my hand when I touched them. Bob had a hoop house full of tomatoes (to protect them from diseases) and a bunch of trellises outside, but the hoop house felt like a magical land. The trellises inside lined both sides of the hoop house, and as the tomatoes grew, we trained them to grow up, up, and up. Eventually, the vines growing on the trellises met at the top of the hoop house, forming a beautiful, bright tomato tunnel from the entrance to the far end.
Even with the trellises, the tomato vines were hanging so low that even I had to crouch down at times to get through. At the entrance of tomato heaven, there were gorgeous, gigantic heirlooms of all sorts of colors, shapes, and sizes. Some of the heirlooms were so large that I was surprised the vine could withstand the weight without breaking, even with the help of the trellis. Farther back there were sungolds and other smaller, pop-in-your-mouth varieties. The grape tomatoes were really interesting because they grew in bunches similar to grapes and were also shaped like small but long and slender grapes. Personally, my favorites were the sungolds. Hope and I spent way too much time picking those little orange beauties straight off the vine in the hot sun and popping them into our mouths, but they were so delicious and addictive that we had a really hard time not eating them.
Here is a (terrible) picture of some of the beautiful tomatoes from the farm (although the picture really doesn't do the tomatoes any justice):

After Salvo, we went to Wegmans & then down to the commons with Lyca. It was nice to walk around, but really, really, really cold. The wind was biting my face and I was happy to seek shelter in the stores. I ended up buying a new pair of running sneakers from the Finger Lakes Running & Triathlon Company, which are going to be really helpful because I have been running on roads in trail sneakers, and now I finally have a pair of road shoes.
The same night that I made the purple coconut rice pudding, I also decided to make some gluten-free chocolate cardamom coffee molasses cookies (very, very long name, I know). The first batch came out completely flat, but tasted AMAZING, so I added some more flour, baking powder, xanthan gum, another egg, and some chocolate chips to the recipe, and it came out really good.
Here is a rough version of the old recipe which didn't work out:
Gluten-free chocolate cardamom coffee molasses cookies
2 tbsp coffee beans
seeds from 6 cardamom pods
2 chocolate hunks (goya chocolate)
¾ tsp xanthan gum
1 ½ tsp bk sda
½ tsp bk pdr
pinch salt
*Wow, I forgot to write down how much flour and I used.... I think I originally used about 1/2 cup buckwheat flour, 1/2 cup oat flour, 1/2 cup butter, and about 3/4 or 1 cup of a mixture of light & brown sugar
**To this I added (after attempting to bake batch #1 and it came out terrible)
½ cup buckwheat flour
1 teaspoon bk pdr
½ tsp x gum
1 egg
a bunch of chocolate chips
Well, obviously, this recipe is a mess and I need to figure out the correct proportions. The main thing is the cookies were really good, and the combination of the coffee, cardamom, chocolate, and molasses was very interesting in a cookie. The cookies were nice and soft, and I think the addition of the chocolate chips was essential. I also really liked using the Goya chocolate instead of 'regular' baking chocolate. **Need to work on recipe!**
The sunset yesterday was absolutely gorgeous. I was driving home and had to park my car and get out to take a picture of this building on the engineering quad because it was glowing:


Thursday, January 20, 2011
Staples
Yesterday, I went ice skating with a few of my girl friends (Karli, Hope, and Deirdre) at the Cass Park ice rink downtown. It was really fun but very cold! I personally prefer Lynah at Cornell because their rink is completely indoors and is much warmer than Cass (the rink there is partially open to the outside, so it is subjected to the outside temperatures and wind). After ice skating, we stopped by Wegman's to pick up a few food items (everyone is just getting back from break, so there are lots of empty pantries), and while shopping, Karli brought up the topic of "staple" food items in our diets. We discussed how everyone has staple items they generally purchase when they go grocery shopping, and how these items might change with the seasons.
Here is a list of my staple foods/ingredients that I am familiar with and use/eat on a regular basis:
COFFEE: I need it. Yes, I am addicted, but it is delicious, and since I have been drinking coffee for far too long considering how old I am, I have become really picky about drinking really good stuff. I usually use a french press, but occasionally use my moka maker, and really need to get a Turkish coffee pot. I have been drinking Gimme's Altamira lately, and it is quite delicious with some fresh raw milk :)
Milk: I never used to drink milk, but now that I have started milking Laura's cow, I drink it all the time in my coffee and sometimes just plain. Clover is done giving milk until she gives birth to her calf in the spring, so I started buying Ithaca Milk Co.'s milk, which is very good, but not quite as good as raw milk :)
Apples: Seriously, the more, the better. I love apples because they are the perfect quick snack. You can put them in your bag or backpack and they are more sturdy than bananas, which usually end up getting smashed and leaking their juices onto all of my stuff. When my blood sugar gets really low and I start getting shaky, I can grab an apple and feel better until I can eat a real meal.

Bananas: I also love bananas, but not as much as apples. I eat them on a regular basis, and love them in my oatmeal in the morning (usually topped with plain, local yogurt, buckwheat granola, applesauce, maple syrup, and raw cashews).
Eggs: they are so wonderful and delicious, and are the building blocks of many, many different kinds of recipes from breakfast omelets to crepes, soufflés, meringue, cakes, and quiches.
Vegetables: Every kind, all the time. My veggie staples change with the growing season (I really can't wait until the tomatoes are dripping off the vines again!). A major staple of my diet is a veggie stir-fry. I start off with onions and loads of garlic, then add things like potatoes, beets, peppers, spinach, kale, collards, chard, etc. My theory is as long as you start off with some high quality olive oil, a little salt and pepper, and loads of fresh veggies, you will end up with a delicious meal :)
Salt, pepper, thyme, oregano, basil. These are my main herbs I use in making everything.
Cinnamon, nutmeg, ginger, cardamom (a new addition) cloves. These are my main spices I use in baking everything.
Oatmeal & yogurt: my staple breakfast (although it doesn't keep me full for very long!)
My breakfast: veggie stir-fry (onion, garlic, mushrooms, potatoes, beets, leafy greens) + eggs + more leafy greens... yum :)

Summer breakfasts:


Winter lunch:

Tuesday, January 18, 2011
Buckwheat-oat molasses cookies
I recently made some delicious gluten-free molasses cookies that tasted just like my grandmother's cookies, and after great success and flavor yesterday with the buckwheat-oat crepes, I decided to try a buckwheat-oat molasses cookie. My friends are slowly trickling back to campus from their adventures over break (and in some cases, the entire fall semester) all over the country and/or world, so I also thought it would be appropriate to make some cookies to share with everyone :)
For this cookie recipe, I basically followed the recipe I developed here: , but used a different combination of flours in place of my gluten free flour blend #1 () and omitted the vanilla because all of mine spilled into my cabinet (thanks for cleaning it, Angela!).
Buckwheat-oat molasses cookies
1 stick butter (1/2 cup)
1/2 cup dark brown sugar, packed
1/4 cup light brown sugar, packed
2 tablespoons maple syrup
1/4 cup molasses
1 egg
¼ cup potato starch flour
¼ cup tapioca flour
¼ cup white rice flour
½ cup oat flour
½ cup buckwheat flour
1 ½ teaspoons xanthan gum
1/2 teaspoon cinnamon
1/2 teaspoon ginger
1/4 teaspoon nutmeg
2 1/2 teaspoons baking soda
1/2 teaspoon baking powder
Preheat oven to 350 degrees Fahrenheit.
Cream butter and sugars. Add vanilla extract, maple syrup, molasses, and egg, beating after each addition. Set aside.
In another bowl, combine flour, cinnamon, ginger, nutmeg, baking soda, & baking powder.
Mix everything together so mixture is a uniform consistency.
Mix dry into wet ingredients.
Roll cookies into little balls & roll in cane sugar.
Bake for about 8 mins or until done :)
Yummy! These cookies are awesome! They should get better once they have been sitting around for a few hours, so I'll check back later and give an update!
Monday, January 17, 2011
Gluten-free Buckwheat-oat crepes
I miss my porch. For the past two summers, I have lived in houses with amazing porches perfect for lazy morning brunches. In the summer, I have all the time in the world to do whatever I want, so I often make elaborate feasts to start off the day. Last summer, crepes were a staple of my morning brunches. In addition to fresh yogurt, berries, maple syrup, and honey, I would often make homemade blueberry sauce or apple compote to fill the crepes with. They were delicious :)
I woke up very early this morning to work on a pattern to make fabric poi, and decided that it would be a perfect morning to come up with a gluten-free crepe recipe. I bought some oat flour yesterday at Greenstar, and had some buckwheat flour lying around, so I decided to experiment...
At first, I took out the white rice, tapioca, potato starch, buckwheat, and oat flours, but decided against using the rice, tapioca, and potato. After all, crepes don't rise, so I didn't really need to come up with a fancy mixture of gluten-free flours in an attempt to create the binding powers of gluten. I choose buckwheat and oat because I felt like they would compliment each other very well.
I decided to make sweet crepes (I am not a fan of savory crepes), so I added a little brown sugar and maple syrup to the batter- just enough to subtly sweeten it without being too nauseating and overpowering.
The hardest part about making crepes is cooking them. You need to make sure your skillet is at the perfect temperature (medium-low), use the perfect amount of butter (seriously just a tiny dab if you have a non-stick pan), and need to perfect the technique of evenly distributing the batter in the pan.
When I went to Montreal over Thanksgiving, I picked up some crepe-making tips from Stephan, the French immigrant we stayed with via couchsurfing: #1. Make sure there are NO CLUMPS in the batter! He actually blended his crepe batter in a magic bullet #2. Actually pick up the pan from the stove when you are pouring the batter in and swirl the batter around in the pan to coat it evenly


Gluten-free Buckwheat-oat crepes
1/2 cup oat flour
1/2 cup buckwheat flour
2 teaspoons dark brown sugar (packed)
1/8 teaspoon salt
2 tbsp butter, melted
1 1/2 cups milk
3 eggs
1 tablespoon maple syrup
Measure out flours into a bowl. Add packed dark brown sugar, salt, & stir. Add melted butter, maple syrup, milk, and eggs, one at a time. Whisk everything in a large bowl, then pour batter in a blender and puree for about 20 seconds to get all of the clumps out (I used the 'puree' setting on my housemate's Blendtec blender).
Heat up a skillet on medium-low heat, and add a tiny little dab of butter. The butter should sizzle when you put it on, but not turn brown or burn. Pick up the skillet and pour about 1/4 cup batter into it, swirling the batter around to evenly coat the bottom. Put on heat, and heat until one the side that is facing down has cooked just enough to turn it over (about a minute). Turn the crepe over, cook for a brief time on second side, and you are done! Make sure to not overcook these! They are meant to be soft and pliable, NOT crunchy and hard (although they are actually pretty good crunchy- the edges of some of my crepes were a little thin and crunchy... yum!).
These crepes are DELICIOUS. They are seriously better than any of the crepes I made last summer, and the combination of dark brown sugar and maple syrup gives them a hint of rich sweetness. YUMMY! GREAT SUCCESS!


Saturday, January 15, 2011
Vegan, gluten-free graham crackers (shaped like kitties!)
I have some catching up to do! Since my last post, my sister randomly decided to visit me for a couple of days (yay!) because she had time off work, and a couple of my good friends came back from break! I helped my friend, Tal, take some pictures of things for his art portfolio that he is using to apply to graduate school (his portfolio is due by Sunday night!), and Angela and I went sleigh riding, ice skating, and dancing!


My housemate from over the summer, Jen, invited me to a housewarming party today for her new housemate (I was subletting from her old housemate, but things didn't work out between them, so she moved out), so I decided that I better make some vegan, gluten-free cookies to bring, just to be safe and make sure everyone could eat them.
I searched for vegan cookies, and found this blog: (which has a cookbook to go with it) which had a recipe for vegan graham crackers. I decided to modify it slightly and make it gluten-free (and kitty-shaped!).


Vegan, Gluten-free graham crackers
1 1/2 cups gluten-free flour blend #1 (I just about used up the rest of it with this recipe!)
1/3 cup dark brown sugar, packed
1 teaspoon baking soda
1/2 teaspoon baking powder
1/2 teaspoon cinnamon
1/2 teaspoon ginger
pinch nutmeg
1/4 teaspoon salt
1/4 cup olive oil
2 tablespoons molasses
1 tablespoon Grade B maple syrup
1 teaspoon pure vanilla extract
a little less than 1/4 cup rice milk
Preheat oven to 350 F. Mix together flour, sugar, baking soda, baking powder, cinnamon, ginger, nutmeg, and salt so everything is a uniform consistency. Add oil, molasses, vanilla, and maple syrup. Stir together, then add rice milk, a little at a time, until dough is nice and workable, not too sticky (I didn't need the whole 1/4 cup).
Knead dough, & roll out with rolling pin (using gluten-free flour to dust rolling pin, working surface, and dough). Cut out with cookie cutters & bake for about 6-7 minutes at 350 degrees Fahrenheit.
These cookies are pretty good! Since I added ginger, they are basically like kitty-shaped gingerbread cookies! They would be good dunked in milk (vegan or non-vegan), made into s'mores, dipped in chocolate, coffee, or crumbled on top of vanilla ice cream (or just eaten by themselves as a crunchy treat)!
Monday, January 10, 2011
Gluten-free pumpkin pancakes (vs. waffles)
Here are some pictures of my yummy brunch! I am going ice skating now at Lynah Rink and then am going to do leatherworking all day, so I don't have time to post the recipe yet, but check back later on tonight!!!


By the time I got home last night, I was absolutely exhausted and starving, so I inhaled some cold leftover gluten-free pizza and then practiced poi for a little while before going to bed...
I really really love breakfast. The morning is my favorite time of day, and I have a serious love for pancakes. Since I can't eat gluten, my pancake intake has significantly declined, and while I have tried the Bob's Red Mill gluten-free pancake mix, I wasn't too big of a fan of it (or any store-bought mixes in general).
Yesterday morning was the perfect morning for a gluten-free brunch. The one thing I really miss about living with a bunch of people is being able to cook for everyone. Now, I usually cook for myself, and always end up with so many leftovers (which is good because I like leftovers), but cooking with other people or for other people is definitely better than cooking and eating alone.
I decided to make pumpkin pancakes and waffles from the same batter to see which would work better (I LOVE, LOVE, LOVE pumpkin!), and in the end, the taste-test and touch-test concluded that the pancakes were the definite winner.
The pancakes and waffles were both really good, but were very dense, much more dense than the light fluffy pancakes being advertised on IHOP commercials (however, I do remember that when making pancakes with 'regular' wheat flour, I did have dense pancakes sometimes). I should have added more milk to the batter, but was interested in experimenting with it. The batter was too thick to cook correctly in the waffle iron (I used the electric waffle iron, but I do have a cast iron stove-top one that I will test out next time), and came out soft but dense, and without the nice crispy waffle exterior. The pancakes were soft but dense, but still really good. I topped the waffles and pancakes with maple syrup, plain yogurt, bananas, and my homemade gluten-free granola (see previous post).
Next time, I think I will definitely either cut back on the flour mixture, or add more milk to make the batter MUCH more thin. But, if you like a dense, hearty pancake, here you go (I used the most popular pumpkin pancake recipe on Allrecipes.com as a reference to make these pancakes):
Gluten-free pancakes #1
½ cup white rice flour
¼ cup potato starch flour
¼ cup tapioca starch flour
½ cup buckwheat flour
½ cup almond flour
1 ½ teaspoon xanthan gum
2 teaspoons baking soda
2 teaspoons baking powder
¼ teaspoon salt
1 teaspoon cinnamon
½ teaspoon ginger
pinch nutmeg
1 ½ cups milk
1 cup pumpkin puree
1 tablespoon olive oil
1 tablespoon molasses
2 tablespoons maple syrup
Combine dry ingredients in a medium-sized mixing bowl, and wet ingredients separately in another bowl. Add dry to wet, stir together until combined.
Get out your griddle and heat it over medium heat. When it is hot (do the water test- if you drip a droplet of water on the griddle, it should dance and sizzle), put some butter on there and then scoop some batter on (since the batter is really thick, you will need to spread it out a bit). Cook for a few mins on one side, then flip over and cook on the other side until done :)
Fresh, homemade mozzarella
Last night, I went to Laura's to milk Clover, and Laura asked me if I wanted to stay and make some mozzarella with her. Hope and I made mozzarella once this past semester with Laura and her friend, Dee, and I have been wanting to make it again, so of course I stayed. Mozzarella is probably the easiest cheese to make, and it is really fun because you get to pull it (to form the stretchy strands) and can mold it into any shape you like (the first time I made mozzarella, I attempted a mozzarella braid which came out really nice):

First of all, you need milk. We used fresh, raw milk from the cow, but if you don't have access to a cow (many people don't, I'd imagine!) then you can go to the store and buy milk there. Just make sure it isn't ultra-high pasteurized.
Other things you are going to need include:
*A large, heavy-bottomed pot which can hold however much milk you are going to use
*A thermometer for lower temps (you are going to need one that has a range of at least 50 degrees Fahrenheit to 115-ish degrees)
*Rennet tablets (www.cheesemaking.com/store/p/108-Tablet-Vegetable-Rennet-10-Tablets.html)
*Citric acid (available online or at a local co-op grocery store/health food store)
*Lipase (www.cheesemaking.com/store/p/132-Lipase-Powder-Italase-mild-2oz-.html)
To make the mozzarella, make sure all of your milk is still fresh (smell it!) and then dump it all into the large pot. Turn the stove on low and begin heating the milk, stirring as you go. If you stir the milk and have a thick enough pot, the milk should not burn to the bottom of the pan. Laura has gas burners which are really great for making cheese because you can really control the temperature with the turn of a knob.
While your milk is slowly heating on the stove, keep an eye on the temperature, and measure out 1 1/2 teaspoons citric acid for each gallon milk you have into a little bowl or cup, a tiny bit of lipase into another bowl or cup (we used about 3 gallons of milk and probably 1/8 teaspoon of lipase), and a rennet tablet (or part of a rennet tablet- we used 1/2 a tablet for 3 gallons of milk) into another bowl or cup. Add a little bit of fresh water to each bowl, just enough to dissolve the citric acid, rennet, and lipase. Set aside.
Once your milk has reached 55 degrees, you are ready to add the citric acid and the lipase. Add them and stir. Continue to slowly heat the milk, stirring as you go.
Once your milk has reached 88 degrees, you can add the rennet, stir once, and let the milk sit for a minute. Then, start to stir again. This is where the magic happens! You start stirring, and the mixture feels like milk, then all of a sudden, it changes to a yogurt consistency and really thickens up, and then separates into curds and whey! This part is really exciting, and make sure not to stir the milk too hard or fast because it will break up the curds, and you don't want that to happen.
Continue slowly stirring the curds until the temperature reaches about 110 degrees, and they are really sticking together and are soft and stretchy. At this point, you can turn off the stove and strain the curds from the whey and gather them into a ball in your hand, squeezing as much whey as you can out of the mozzarella. Place each ball into a separate bowl, and once you have gotten all of the curds out of the whey, turn the heat back on, and begin to heat the whey until its hot enough that you can just stand to stick your fingers in it without burning yourself.
Turn off the stove, move the pot of whey to a counter top or table, and put a few of the mozzarella balls into the whey to warm up. Fish them out of the whey and if they are soft and pliable enough, start to pull and stretch! This is the fun part of making mozzarella :) You have to keep dunking the mozzarella into the hot whey to keep it nice and soft, and at this point, you can add about a teaspoon of salt (we used Kosher sea salt) to each ball. Add the salt, making sure to sprinkle it out evenly over a large surface area of the mozzarella, fold the mozzarella so the salt is in the middle of the cheese, and then put the cheese back into the whey to warm up again before you continue to stretch it.
After you have stretched it for a little while, form the mozzarella into a ball and place in a bowl of cold water. Continue to stretch the other mozzarella balls until you are done!
If you just so happen to have pigs, you can feed them the whey (mozzarella-making produces a LOT of whey) because Laura says that they love it, or you can just dump it outside or down the drain.
Now, you have homemade mozzarella, and can store it in an airtight container in your fridge, or freeze it for a later date! Yummm!
When I got home last night, I used the homemade mozzarella to make some homemade pizza (with my own sauce and crust, of course). I had thrown together some sauce in a crock pot before I went to Laura's house (roasted peppers, mushrooms, onions, garlic, spices), and when I got home, I attempted a gluten-free pizza crust.
I used a mixture of brown rice flour, cornmeal, garbanzo bean four, and 'sweet' white sorghum flour, but wasn't very happy with the end result. The dough didn't rise, and wasn't extremely tasty, but it wasn't too bad though. I will *hopefully* come up with some DELICIOUS pizza dough soon!
..wow, looking back, I now realize that I forgot to add a binder to the pizza dough (xanthan gum or guar gum)... I must have been tired last night!
Saturday, January 8, 2011
Gluten-free molasses cookies
5:01 p.m.
My grandmother, Marie Calabrese (we call her Nana) makes the most delicious molasses cookies I have ever tasted. They are perfect... nice and thin but chewy, oh-so chewy. Yum :)
My father stopped by and took me out to dinner last week on his way home from his parents' house for Christmas celebrations, and gave me some molasses cookies that Nana baked... I wish I could have eaten them (hello gluten!). I gave the cookies to Laura for her and her daughters to enjoy... and decided that it was time to attempt some gluten-free molasses cookies.
To create this recipe, I used the same flour blend (gluten-free blend #1) that I have used for the past few recipes simply because when I made the mix, I made a lot of flour. I want to experiment with different flour recipes for different baked goods to see what goes well with the textures and flavors of different combinations of flours.
***the most important thing to remember in cooking & baking (especially when you are cooking and baking gluten-free!!!) is that not every attempt at a recipe comes out perfect the first time.
***Molasses cookie attempt #1: FAILURE!***

It is always so sad to open up the oven and find a completely flat sheet cookies that have spread out paper thin. You feel like you completely failed- your recipe sucks.
When I mixed the dough together, I noticed that it was way too thin and sticky to be a rolled cookie (usually you would roll the molasses cookies in little balls, roll them in sugar, then bake them, creating a nice crispy outside from the sugar but a soft, chewy inside). I used my chocolate chip cookie recipe as a basis for this recipe, which was a recipe for drop cookies. Now I really understand the difference between a drop cookie and a molded (into little balls, that is) cookie. Drop cookies have a much thinner batter than molded cookies which results from a higher wet:dry ratio (drop cookies have less flour to the amount of wet ingredients (fat, sugar, egg, molasses) than molded cookies do).
Batch #1 of my cookies came out terribly. They spread out, did not rise, and looked more like really burned lace cookies than molasses cookies (they weren't burned, lace cookies are just usually light-colored). Anyway, I hypothesized that my major issue with these cookies was my wet to dry ratio was messed up, and I also probably needed more leavening agent (baking soda). So, I mixed 1/2 cup more of the gluten-free flour blend, 1/4 teaspoon baking powder, and 1 more teaspoon of baking soda in a separate bowl, and mixed this in to the rest of the cookie dough that had not been baked yet.
When I did this, the cookie dough completely transformed itself from a drop cookie failure to a nice molded cookie dough, although this dough did seem much softer than 'regular', gluten-laden molasses cookies. I carefully rolled the cookies in between my palms, rolled them in pure cane sugar, and then tried baking them again....
...I held my breath as I opened the oven, and......

... SUCCESS!!!
The cookies came out really good... the cane sugar created a nice, crispy coating on top, while the inside stayed nice and soft. These cookies taste even better once they have cooled off and have been sitting around for a while.
Here is the original recipe which did not work out as written because I didn't have enough flour and baking soda... (so don't use this recipe, duh)...
Molasses Cookies- attempt #1
1 stick butter (1/2 cup)
1/2 cup dark brown sugar, packed
1/4 cup light brown sugar, packed
1 teaspoon vanilla extract
2 tablespoons maple syrup
1/4 cup molasses
1 egg
1 cup gluten-free flour blend #1
1/2 teaspoon cinnamon
1/2 teaspoon ginger
1/4 teaspoon nutmeg
1 1/4 teaspoons baking soda
1/4 teaspoon baking powder
Here is a **revised** version of the recipe, but I am going to have to try this recipe again to see if the proportions of wet and dry are correct...
Molasses Cookies- *Revised*
1 stick butter (1/2 cup)
1/2 cup dark brown sugar, packed
1/4 cup light brown sugar, packed
1 teaspoon vanilla extract
2 tablespoons maple syrup
1/4 cup molasses
1 egg
1 3/4 cups gluten-free flour blend #1
1/2 teaspoon cinnamon
1/2 teaspoon ginger
1/4 teaspoon nutmeg
2 1/2 teaspoons baking soda
1/2 teaspoon baking powder
Preheat oven to 350 degrees Fahrenheit.
Cream butter and sugars. Add vanilla extract, maple syrup, molasses, and egg, beating after each addition. Set aside.
In another bowl, combine flour, cinnamon, ginger, nutmeg, baking soda, & baking powder.
Mix everything together so mixture is a uniform consistency.
Mix dry into wet ingredients.
Roll cookies into little balls & roll in cane sugar.
Bake for about 9 mins or until done :)
... yum :)
oh yeah, it snowed (finally!)


My grandmother, Marie Calabrese (we call her Nana) makes the most delicious molasses cookies I have ever tasted. They are perfect... nice and thin but chewy, oh-so chewy. Yum :)
My father stopped by and took me out to dinner last week on his way home from his parents' house for Christmas celebrations, and gave me some molasses cookies that Nana baked... I wish I could have eaten them (hello gluten!). I gave the cookies to Laura for her and her daughters to enjoy... and decided that it was time to attempt some gluten-free molasses cookies.
To create this recipe, I used the same flour blend (gluten-free blend #1) that I have used for the past few recipes simply because when I made the mix, I made a lot of flour. I want to experiment with different flour recipes for different baked goods to see what goes well with the textures and flavors of different combinations of flours.
***the most important thing to remember in cooking & baking (especially when you are cooking and baking gluten-free!!!) is that not every attempt at a recipe comes out perfect the first time.
***Molasses cookie attempt #1: FAILURE!***

It is always so sad to open up the oven and find a completely flat sheet cookies that have spread out paper thin. You feel like you completely failed- your recipe sucks.
When I mixed the dough together, I noticed that it was way too thin and sticky to be a rolled cookie (usually you would roll the molasses cookies in little balls, roll them in sugar, then bake them, creating a nice crispy outside from the sugar but a soft, chewy inside). I used my chocolate chip cookie recipe as a basis for this recipe, which was a recipe for drop cookies. Now I really understand the difference between a drop cookie and a molded (into little balls, that is) cookie. Drop cookies have a much thinner batter than molded cookies which results from a higher wet:dry ratio (drop cookies have less flour to the amount of wet ingredients (fat, sugar, egg, molasses) than molded cookies do).
Batch #1 of my cookies came out terribly. They spread out, did not rise, and looked more like really burned lace cookies than molasses cookies (they weren't burned, lace cookies are just usually light-colored). Anyway, I hypothesized that my major issue with these cookies was my wet to dry ratio was messed up, and I also probably needed more leavening agent (baking soda). So, I mixed 1/2 cup more of the gluten-free flour blend, 1/4 teaspoon baking powder, and 1 more teaspoon of baking soda in a separate bowl, and mixed this in to the rest of the cookie dough that had not been baked yet.
When I did this, the cookie dough completely transformed itself from a drop cookie failure to a nice molded cookie dough, although this dough did seem much softer than 'regular', gluten-laden molasses cookies. I carefully rolled the cookies in between my palms, rolled them in pure cane sugar, and then tried baking them again....
...I held my breath as I opened the oven, and......


... SUCCESS!!!
The cookies came out really good... the cane sugar created a nice, crispy coating on top, while the inside stayed nice and soft. These cookies taste even better once they have cooled off and have been sitting around for a while.
Here is the original recipe which did not work out as written because I didn't have enough flour and baking soda... (so don't use this recipe, duh)...
Molasses Cookies- attempt #1
1 stick butter (1/2 cup)
1/2 cup dark brown sugar, packed
1/4 cup light brown sugar, packed
1 teaspoon vanilla extract
2 tablespoons maple syrup
1/4 cup molasses
1 egg
1 cup gluten-free flour blend #1
1/2 teaspoon cinnamon
1/2 teaspoon ginger
1/4 teaspoon nutmeg
1 1/4 teaspoons baking soda
1/4 teaspoon baking powder
Here is a **revised** version of the recipe, but I am going to have to try this recipe again to see if the proportions of wet and dry are correct...
Molasses Cookies- *Revised*
1 stick butter (1/2 cup)
1/2 cup dark brown sugar, packed
1/4 cup light brown sugar, packed
1 teaspoon vanilla extract
2 tablespoons maple syrup
1/4 cup molasses
1 egg
1 3/4 cups gluten-free flour blend #1
1/2 teaspoon cinnamon
1/2 teaspoon ginger
1/4 teaspoon nutmeg
2 1/2 teaspoons baking soda
1/2 teaspoon baking powder
Preheat oven to 350 degrees Fahrenheit.
Cream butter and sugars. Add vanilla extract, maple syrup, molasses, and egg, beating after each addition. Set aside.
In another bowl, combine flour, cinnamon, ginger, nutmeg, baking soda, & baking powder.
Mix everything together so mixture is a uniform consistency.
Mix dry into wet ingredients.
Roll cookies into little balls & roll in cane sugar.
Bake for about 9 mins or until done :)
... yum :)
oh yeah, it snowed (finally!)


Friday, January 7, 2011
8:10 AM
I stopped at Wegman's yesterday for eggs on the way home from Coco's house because I didn't feel like dealing with one-way streets to get to Greenstar, and obviously, I couldn't just get eggs...
...Crystal in a grocery store is like giving a thirteen-year-old girl a shopping spree at the mall :)
Anyway, I tried not to get too much, and ended up leaving with new toothbrushes (yay!), loads of bananas (I capitalized on the opportunity to buy RIPE bananas from Wegman's- they are usually bright green), a carton of cage-free eggs ($3.20 - WHAT? .... LOCAL eggs from happier hens are cheaper than that!), and two bags of Nestle chocolate chips so I can try to perfect the gluten-free chocolate chip cookie.
When I woke up this morning, I looked outside and saw a light dusting of snow, and thought that it would be the perfect morning to make banana bread with some of my ripe bananas (I saw a little bunch that was over-ripe, so I bought it with the intention to make banana bread in mind).
I decided that the flavors of the Gluten-free flour blend #1 that I shared in a previous post would compliment the flavors of the banana, and also decided to play with combining the flavors of cinnamon, cardamom, maple syrup, ginger, and applesauce in my bread.
Gluten-free banana bread #1
3 tbsp butter, softened
1/2 cup dark brown sugar, packed
3 tbsp applesauce
2 tbsp plain yogurt
1/4 cup maple syrup
1 teaspoon molasses
1 teaspoon vanilla
2 eggs
3 medium-sized bananas
seeds from 3 green cardamom pods
1 heaping teaspoon cinnamon
1 teaspoon ginger
pinch cloves
3 tsp baking soda
1/2 tsp baking powder
1 1/2 cups gluten-free flour blend #1 (see previous post for recipe)
**Preheat oven to 350 degrees
In a large bowl, combine softened butter and dark brown sugar, cream with fork. To this, add applesauce, yogurt, maple syrup, molasses, and vanilla, stirring after the addition of each ingredient. Then, add 2 eggs to the mixture, and beat with electric mixer until combined. Next, add bananas (in small chunks), and beat with mixer until everything is pretty uniform in texture (if you like chunkier banana bread, don't beat as much.. my bananas could have been a little more ripe and mushy, so I used the beater to mix everything). Set aside.
Measure out 1 1/2 cups of the gluten-free flour blend #1() into a medium-sized mixing bowl.
Crush the seeds from 3 cardamom pods so they are a fine powder (I actually put the cardamom seeds and the cinnamon into my coffee grinder and it worked very well- I needed to put the cinnamon in there because the seeds themselves weren't enough material to grind on their own).
Add cardamom, cinnamon, ginger, cloves, baking soda, and baking powder to the flour. If you have a sifter, sift everything together. If not, mix VERY well to make sure everything is a uniform consistency.
Add dry mixture to wet mixture, stir to combine.
Use olive oil to grease a loaf pan, pour mixture into pan.
**note: after taking out of oven and taste-testing, I realized that the center really didn't cook quick enough and the sides/top/bottom cooked much quicker. I would highly suggest that you pour most of the mixture into a loaf pan, but also make 2 or 3 regular-sized muffins or 4-5 mini-muffins with the mixture. That way, your bread will bake perfectly! :)
Bake for about 40 minutes or until done!
Cardamom:
 ..... I just took the bread out of the oven.... WOW. It is REALLY GOOD. The cardamom gives it a really interesting flavor, it is sweet enough without being obnoxiously sweet (many quick bread recipes call for A LOT of sugar- I've seen pumpkin bread recipes with 2 cups of sugar- OMG!), with a not-so-overpowering banana flavor. YUM. The gluten-free flour blend recipe also worked really well with the flavors of the banana and spices that went into the bread & it is healthier than most banana bread recipes out there!!!
I stopped at Wegman's yesterday for eggs on the way home from Coco's house because I didn't feel like dealing with one-way streets to get to Greenstar, and obviously, I couldn't just get eggs...
...Crystal in a grocery store is like giving a thirteen-year-old girl a shopping spree at the mall :)
Anyway, I tried not to get too much, and ended up leaving with new toothbrushes (yay!), loads of bananas (I capitalized on the opportunity to buy RIPE bananas from Wegman's- they are usually bright green), a carton of cage-free eggs ($3.20 - WHAT? .... LOCAL eggs from happier hens are cheaper than that!), and two bags of Nestle chocolate chips so I can try to perfect the gluten-free chocolate chip cookie.
When I woke up this morning, I looked outside and saw a light dusting of snow, and thought that it would be the perfect morning to make banana bread with some of my ripe bananas (I saw a little bunch that was over-ripe, so I bought it with the intention to make banana bread in mind).
I decided that the flavors of the Gluten-free flour blend #1 that I shared in a previous post would compliment the flavors of the banana, and also decided to play with combining the flavors of cinnamon, cardamom, maple syrup, ginger, and applesauce in my bread.
Gluten-free banana bread #1
3 tbsp butter, softened
1/2 cup dark brown sugar, packed
3 tbsp applesauce
2 tbsp plain yogurt
1/4 cup maple syrup
1 teaspoon molasses
1 teaspoon vanilla
2 eggs
3 medium-sized bananas
seeds from 3 green cardamom pods
1 heaping teaspoon cinnamon
1 teaspoon ginger
pinch cloves
3 tsp baking soda
1/2 tsp baking powder
1 1/2 cups gluten-free flour blend #1 (see previous post for recipe)
**Preheat oven to 350 degrees
In a large bowl, combine softened butter and dark brown sugar, cream with fork. To this, add applesauce, yogurt, maple syrup, molasses, and vanilla, stirring after the addition of each ingredient. Then, add 2 eggs to the mixture, and beat with electric mixer until combined. Next, add bananas (in small chunks), and beat with mixer until everything is pretty uniform in texture (if you like chunkier banana bread, don't beat as much.. my bananas could have been a little more ripe and mushy, so I used the beater to mix everything). Set aside.
Measure out 1 1/2 cups of the gluten-free flour blend #1() into a medium-sized mixing bowl.
Crush the seeds from 3 cardamom pods so they are a fine powder (I actually put the cardamom seeds and the cinnamon into my coffee grinder and it worked very well- I needed to put the cinnamon in there because the seeds themselves weren't enough material to grind on their own).
Add cardamom, cinnamon, ginger, cloves, baking soda, and baking powder to the flour. If you have a sifter, sift everything together. If not, mix VERY well to make sure everything is a uniform consistency.
Add dry mixture to wet mixture, stir to combine.
Use olive oil to grease a loaf pan, pour mixture into pan.
**note: after taking out of oven and taste-testing, I realized that the center really didn't cook quick enough and the sides/top/bottom cooked much quicker. I would highly suggest that you pour most of the mixture into a loaf pan, but also make 2 or 3 regular-sized muffins or 4-5 mini-muffins with the mixture. That way, your bread will bake perfectly! :)
Bake for about 40 minutes or until done!
Cardamom:

 ..... I just took the bread out of the oven.... WOW. It is REALLY GOOD. The cardamom gives it a really interesting flavor, it is sweet enough without being obnoxiously sweet (many quick bread recipes call for A LOT of sugar- I've seen pumpkin bread recipes with 2 cups of sugar- OMG!), with a not-so-overpowering banana flavor. YUM. The gluten-free flour blend recipe also worked really well with the flavors of the banana and spices that went into the bread & it is healthier than most banana bread recipes out there!!!
Success! :)
Thursday, January 6, 2011
Gluten-free pumpkin bread & carrot cake
Here are a couple of recipes I developed a while ago for gluten-free pumpkin bread and carrot cake :)
Gluten-Free Pumpkin Bread
1 3/4 cup Brown Rice Baking Mix (Fearn brand)
1/2 cup potato starch flour (Ener-G brand)
1/2 cup tapioca flour (Ener-G brand)
1 cup almond flour, packed
1/4 cup white rice flour
2 tsp baking soda
2 tsp baking powder
3 tsp xanthan gum
1 tsp nutmeg
2 tsp cinnamon
1/4 heaping tsp cloves
**These are dry. Mix all together very well. If possible sift them so they are all the same consistency.
6 eggs
2 cups applesauce
2/3 cup grapeseed oil
2 cups sugar
1/2 cup maple syrup
20 oz pumpkin (equivalent to 1 (15 oz) can + 1/3 (15 oz) can)
**Blend together wet ingredients with hand mixer
**After you are done separately mixing wet and dry ingredients, combine!
Cook until done!
Gluten-free carrot cake
1/4 cup brown rice baking mix
3/4 cup white rice flour
1/2 cup potato flour
1/4 cup almond flour
1/4 cup tapioca flour
1 1/2 tsp xanthan gum
1 tsp bk sda
1 tsp bk podwr
1 tsp cinn
1/4 tsp nutmeg
pinch cloves
**Mix dry
4 eggs
1 cup sugar
1/2 cup applesauce
1/2 cup olive oil
1/2 cup maple syrup
**Blend wet
*Combine wet+ dry
*Add slightly less than 4 cups of carrots
*Bake until done!
***BOTH Recipes are to be baked at 350 degrees F.
Tuesday, January 4, 2011
Gluten-free granola


Things that are true of most granola on the market:
1.) Not gluten-free
2.) Even if it is gluten-free, it is REALLY expensive and/or doesn't taste very good
3.) Full of sugar and oil
4.) What you get is what you get. Can't customize it.
I made granola a really long time ago and it was so easy and came out so delicious that I don't know why I have waited so long to make it again.... oh yeah, I remember now... every time I buy all of the add-ins (raisins, nuts, etc.), I end up eating them before I can make anything with them... oops!
Anyway, I wanted to make some granola so I didn't have to go spend $10 a pound on bulk gluten-free granola at Greenstar- seriously, $10 a pound!?
I like to use applesauce and maple syrup to add moisture and a little flavor & sweetness to the oats instead of sugar and oil because applesauce and maple syrup are quite a bit healthier (most granola has cups of sugar and oil, yuck). The combination of the maple syrup, applesauce, and cinnamon smelled just like apple crisp when it cooked and made me super hungry for dinner #2 :)
Gluten-free maple apple crisp granola
Ingredients:
3 cups gluten free oats
1/2 heaping cup applesauce
1/4 cup Grade B (dark) maple syrup
1 teaspoon cinnamon
******these first 4 ingredients combine to form the base of the granola (oats, applesauce, maple syrup, cinnamon)
******The following ingredients are just what I had on hand, and can be modified however you like. If you don't like coconut, don't add it! If you hate raisins, throw in some cranberries. Seriously, any dried fruit would taste soo good with this granola :)
1 cup coconut
1 cup golden raisins
1 cup cashews
1 cup raisins
1 cup currants
6 dried dates, pitted and chopped
Preheat oven to 300 degrees. In a large bowl, combine gluten-free oats, cinnamon, applesauce, and maple syrup. Stir until all combined and all of the oats are evenly coated with the cinnamon, applesauce, and maple syrup mixture.
Grease a large cookie sheet with olive oil, and spread out mixture on cookie sheet so it is about 1/2 inch thick. Put in the oven, when you start to smell it cooking, that means you need to start mixing it. Mix it about every 10-15 minutes so that the granola all cooks evenly. It takes about an hour to bake (mine actually took less, but I am not exactly sure how long). You know it is done when you pick up a piece of granola and it feels crunchy in your fingers, and when you taste it, it is crunchy and not soft at all.
Before your granola is completely done cooking (~5-10 mins before), you can add in some of your optional ingredients such as raisins, dried fruit, and nuts. This dries the fruit out a little bit and toasts the nuts so when you store the granola, the oats will not absorb any of the residual moisture left in the fruit. Personally, I like my nuts raw, so I usually won't even put them in the oven.
Once done, take out of the oven and store in an airtight container.
This granola is REALLY tasty with milk like a cereal, or as a topping for yogurt (or even hot oatmeal!)... yummmm! :)


Sunday, January 2, 2011
Homemade yogurt

Bare ground and dark clouds of January...


The drive to Coco's house this morning was absolutely beautiful! Yesterday it was unseasonably warm (52 degrees!) and today it was a bit cooler (around 30 degrees) and quite cloudy. The clouds were so dark and low, touching the hills in some places. It was so pretty that I felt compelled to stop my car on a 55 mph road (no, there was nobody behind me) to take some pictures :)
Last night, in addition to my chocolate chip cookies, I also attempted to make yogurt for the first time. I went to Laura's house to milk her cow, Clover, on Friday night, and had a gallon of fresh, creamy, delicious milk to play with. Laura gave me some starter cultures for making yogurt, but since I knew that you can also use already made yogurt as a starter culture, I decided to experiment a little bit. I attempted 2 batches of yogurt, one with Laura's culture, and one using 1/4 cup plain yogurt from Wegman's.
Making yogurt is really REALLY easy (that is, if you have a way to keep the yogurt around 90-100 degrees for 6-12 hours to let the good bacteria work their wonders). Each recipe used a quart of milk (equivalent to 4 cups!), and the first step is to heat up the milk to 185 degrees Fahrenheit (I bought a candy thermometer at Wegman's to help me with this) and then take the milk off the stove and let it cool to 110 degrees. When it reached 110 degrees, I separated out the milk into two different containers, each containing 4 cups. To one container, I added a packet of Laura's culture, and to the other, I added 1/4 cup plain yogurt. I have been reading things online about how to make yogurt, and people say you can just insulate a pot with towels and stick it in a warm oven overnight and that should do the trick, so I decided to try this technique with the milk + Laura's culture mixture. The mixture was in the pot I used to heat up the milk, so I wrapped it up in 2 bath towels and put it in the warm oven. I then decided to try to minimize the amount of warm air that would escape from the oven by covering the burners and vents with aluminum foil (I made sure the oven was turned OFF and UNPLUGGED before doing these things-you can't really do this with an electric oven). The other mixture (yogurt + heated & cooled milk) went into my crock pot. I turned the dial to the "warm" setting, hoping that it wouldn't be too warm, and covered the top with 2 kitchen towels.
After I did all of this, I was pretty tired of cooking (I had already made dozens of chocolate chip cookies!) so I decided to go read/go to bed. When I woke up in the morning, I was really excited to see how my yogurt was doing......
...unfortunately, both yogurts failed! I kind of expected neither to work because I didn't have a way to keep the yogurt at a consistent 90-100 degree temperature for such a long time (this temperature is crucial for the bacteria to turn the milk into yogurt). The oven/towel method ended up cooling off too much (thus the temperature was too cool for the bacteria), and thus I was left with a soupy mixture that smelled and tasted like yogurt but was the consistency of a drinkable yogurt (I did put this in my refrigerator to save for possible smoothies), and the crock pot's "warm" setting was WAY too warm, so although the yogurt was the perfect consistency, it burned :(
Anyway, this was a really valuable learning experience, and i now know that i really need to find a way to keep the yogurt at the correct temperature. This is the KEY thing you need in making yogurt. When I figure this out, I will try again... hopefully soon!
Subscribe to:
Posts (Atom)